I started using
Ubuntu 12.04 and since I did a clean installation I had to re-install and configure a lot of my tools. One of them was Synergy. Synergy let's you share one mouse and keyboard among multiple computers, more or less like a
KVM but with out the hardware.
I was using
Mouse with out borders from Microsoft before, but as every tool that comes from them it only works with Windows and I needed something that could work on Windows and Linux and
Synergy was the best option. What's more Synergy also works with Mac so If one day I get one, I know I would be able to use it there as well ;)
Anyways, the first thing I tried was to do a
sudo apt-get install synergy
It did work, but It installed an old stable version which seems to have some problems connecting to Windows 7. Like anything in life I had to do it the long way:
Download the beta version from its web site. Here it is the link. Download the same version for each platform you wanna install it. by the time of this post 1.4.9 was the latest version.
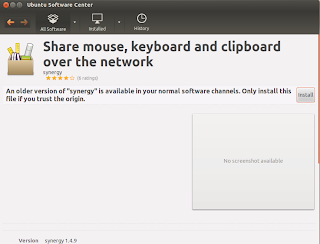 |
| Installing Synergy |
Just double click on it and it will automatically open the Ubuntu Software Center. Click on install, you might need to enter your administrator password. Also, you will get a "The package is of bad quality" alert but you can press "Ignore and Install" to continue.
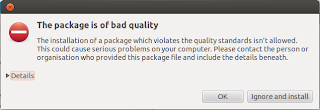 |
| Alert window |
Once it is installed you just execute it.
The configuration window will show up and you either configure the server interactively or use an specific configuration file. I chose the second option since I like writing my own configurations. Press Stop and just create a new document
.synergy.conf and save it in your home directory then add these lines:
section: screens

        Venus:

        Marcelo:

end


section: aliases

        Venus:

                192.168.1.125

        Marcelo:

                192.168.1.131

end


section: links

        Venus:

               right = Marcelo

        Marcelo:

               left = Venus

end
If you notice there are 3 sections:
screens, where you define the number of screens you are going to use
aliases, here you need to assign each screen its IP address
links, is where you define the position of these screens. Which on is on the left, right, up, down, etc
One quick note here, you can try pinging the computer by its name and if that does not work you will have to add the computer and its ip to your hosts file. This in order to make Synergy work properly.
Windows:
C:/Windows/System32/etc/drivers/etc/hosts
Ubuntu:
etc/hosts
Finally, press
Start again and make sure the option "
Use existing configuration" is selected and then browse to the
.synergy.conf file.
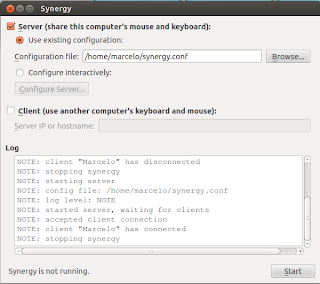 |
| Config Window |
The installation on Windows is so much simpler since we configured Ubuntu as server that means that the Keyboard and Mouse are plugged to the Ubuntu machine and it is sharing them with Windows.
I have been using this configuration for a week right now and I noticed some lag on the windows machine. I am not sure if it is because it is a beta version and it is not fully compatible with Windows 7 or because the server is on the Ubuntu or what, but sometimes the synergy process consumes more CPU than it should. I will monitoring and update this post if I find something else.
Please, let me know if you have any questions.
Now, I just wish there was a way to share mouse and keyboard with Chrome OS :)